Bonds: Decorative Plaster Moulding Fixing Instructions.
Materials and Tools Needed
Plaster Adhesive.
An Electric Cross Cut Mitre Saw.
Pencil
Tape Measure
Small Pallet Knife
3 or 4 inch Wall Scraper
Some Clean Cloth
Fine-Toothed Saw (you can also use this to mark out your Mitred Corners)
Some 40mm or 50mm Panel Pins
Panel Pin Hammer or other Small Hammer
A Wire Brush
A Soft Hand Brush (borrow the one from the kitchen cupboard)
A pastry brush (don't borrow the one from the kitchen. Divorces are expensive things). Go out and buy one.
A Work Surface or Bench
Some Water
A small mixing board (a 12" square piece of ply will do)
Some good Steps, or Working Platform.
A Straight Edge at least 3 feet long. (I usually use an off-cut of Architrave)
If fixing cornice, enlist the help of a friend, or the wife
Guidelines to the use of tools and materials.
Having read several of the instructions published in other sites on the net, it has become obvious to us that most of them have been written by people who have never fixed decorative plaster to a wall in their lives. Most of the instructions we have read simply wouldn't work in the real world, and complicate a very simple operation by giving bad advice. If you follow the instructions below, not only will you finish up with a beautiful room, but you will have learned to do something generally shrouded in mystique, and befuddled by jargon, and discovered it really is very simple after-all. It may help you to print this page, so you can refer to it as you work.
The danger of Sandpaper
Firstly, if anybody has ever told you to have sandpaper to hand when fixing decorative plaster, you should shoot him immediately. The last thing you want to do is ruin the fine smooth and intricately moulded patterns on decorative plaster by touching it with sandpaper. If you do this, you will never remove the damage you have done, and it will always stand out even after you've finished the whole room. You will never forgive yourself.
The Right Tools for Cutting the Corners
It is usual for instructions of this type to specify the need for a Mitre Block for cutting corners. Personally I think this is more book learned advice and I don't agree with it for the following reasons: You will need a mitre block which can cut at almost any angle in one plane, whilst cutting at a guaranteed 45 degrees in the other. Most Mitre Blocks can not do this. So unless you are prepared to pay a lot of money for the right sort of mitre block, or you can make your own specifically designed for the cornice you are about to work with, forget Mitre Blocks.
If you attempt to cut plaster reinforced with fibre glass strands with a standard hand saw, you will rapidly discover the reason why I advise against it. Unless you are very careful, and only cut drawing the saw towards you with the set of the teeth, the teeth will catch in the fibre, twist the saw, and probably break your coving. Do what we all do. Use the back of the hand saw as a straight edge and T square, and do the cutting with an electric cross cut saw, you will enjoy the experience much more.
You will also find that most Mitre Blocks are simply too small to help you much with cutting your corners because the cornice is wider than the block. If you do not cut the mitre at precisely the correct angle to suit the cornice you will finish up with a mess.
To cut the mitre properly, you must cut it to the angle that matches the distance the cornice stands out from the wall in the vertical plane, whilst at the same time cutting at a 45 degree angle in the horizontal plane. The easiest and most efficient way I know of doing this is with a tape, a pencil and an electric cross cut mitre saw with a sliding blade which can also be tilted from the vertical to a 45 degree angle.
You can use the back of your hand saw to act as a straight edge to help you mark the cornice ready for cutting.
With the advent of modern electric cross cut mitre saws with sliding and tilting blades, it is much easier to use one of these to cut your corners, and usually just as cheap as a good Mitre Block. Virtually any good high street DIY store will sell them, and once you have one, you will find it immeasurably useful for all sorts of jobs, including fixing Architrave round doors, Dado Rails, Skirting Board and lots more. It will not just help you to fix cornice. In fact, once you get used to using one you will probably consider it the best tool you ever bought. Unfortunately Bonds don't sell them - yet.
The Surface You've Got
It is also often said that you should make sure the wall is straight and flat. Well I've never seen a straight flat wall in my life, and I bet you haven't either, so you'd better forget that rubbish as well, you will have to work with what you've got.
Making Things Manageable
Cornice usually comes in long lengths, anything from 2 metres up to 3 metres long, it is heavy and tends to flop about a bit under its own weight. If this is the first time you have fixed cornice, I would suggest you cut the first couple of lengths you're going to use into shorter more manageable lengths. Ultimately this will not make the slightest bit of difference to the way it looks when you're finished, but it will make fixing it a lot easier until you know what you're doing.
You will find working with 3 or 4 foot lengths a lot easier than working with something 8 feet long. If the cornice is plain, then you don't need to worry about anything, just cut it (be sure to cut it at a right angle to the length - use your hand saw as a set square to mark it or the electric cross cut saw you bought for the job). If your cornice is patterned, then you will need to find the pattern repeat. Look at the ends and this will come clear. All patterned cornice is moulded to match end to end, in just the same way as wallpaper matches edge to edge.
Find where the pattern repeats in the length, and you can safely cut the cornice into shorter lengths at these points, then the pieces will always match, even when you forget which off-cut goes with which. When you fix the cornice, the adhesive in the join will put back the plaster your saw cut out. If you don't want to cut it, because you're not sure of yourself, or you don't know if you have the skill to ensure the pattern repeats properly, then you should at least enlist some help before starting. You will need somebody to hold the other end while you work, or you will simply finish up with a lot of broken cornice.
Other Myths and Misconceptions
You may have heard a rumour that cornice comes with end blocks. It doesn't. Some people say start in the middle of the wall and work towards the corners; this is a myth, so is doing all the corners first then work towards the middle of the walls. Unless you are working with plain cornice, both will ultimately lead to miss-matching of patterns, either in the corners or the middle of the wall, so treat these suggestions with the contempt they deserve.
Start in one of the corners next to the door, not the one directly above it. From that corner, work in the same direction all around the room moving initially away from the door. When you get to the point where you're one length away from the corner above the door, stop.
Go back to the corner you originally started in and work from that towards the corner above the door, again until you are one length away from the door corner. You should now work evenly along the final two walls into the door corner. If you do get a miss-match of pattern in the final corner, it will be in the least noticeable part of the room, and you can usually mask it, or nobody will notice anyway.
Even if you have bought plain cornice for fear of not being able to match the pattern on a patterned one, you should still fix it the correct way. Then, once you discover how easy this thing is, the next time you buy cornice you can invest in some really intricate pattern in the full knowledge that you can do it.
Working With the Correct Adhesive
When applying decorative plaster to the walls, you should always ensure that you have applied sufficient adhesive so that it squeezes out from the join when you press the plaster firmly against the wall.
Working With the Correct Adhesive
When applying decorative plaster to the walls, you should always ensure that you have applied sufficient adhesive so that it squeezes out from the join when you press the plaster firmly against the wall.
Always remember to wet the surface of the wall and ceiling where the decorative plaster comes in contact, and wet the edges or surface of the decorative plaster where you will put adhesive. (This is what you need the pastry brush for, and why it's a good idea not to use one that will find its way back into the kitchen.)
Most instructions I read suggest you then wipe this excess off with a damp cloth. This is more book learned advice, and doesn't work long in the real world. You will very quickly find that the nice clean cloth you started with turns into a mess of cloth and adhesive, which quite rapidly sets in the cloth, and makes the thing completely un-useable.
Millions of years of evolution endowed all (or at least most) humans with flexible long thin things on the ends of their arms, called fingers. These are incredibly useful, especially when fixing cornice. Wipe the excess adhesive off with the tip of a finger. You can then use this excess adhesive to fill any small cavities left along the joint, or scrape it off on the edge of your adhesive mixing board or mortar board and use it again. Only use the damp cloth if you have to, and never use it to clean off excess adhesive. Your fingers do the job much better than anything made by man. You can use the damp cloth to clean your hands later.
Ensure the adhesive is made from the same basic materials as the decorative plaster.
Ensure the adhesive is made from the same basic materials as the decorative plaster.
Don't fall into the trap of buying some over priced plastic, silicone or resin based adhesive simply because it comes in a pretty tube, and your brother or a salesman has told you it is a wonderful thing which will stick anything to anything. This stuff will behave in an entirely different way to the plaster as time passes. It shrinks differently, it discolours differently, and it usually deteriorates rapidly after just a few years, leading to all sorts of re-decoration problems.
The adhesive you use should come in powder form, and basically be the same plaster compound as the decorative plaster itself was made from. This is usually quite cheap, ages in exactly the same way as the plaster itself, and will last decades, if not centuries, without parting company with the wall or the decorative plaster.
I can take you to hundreds of old properties where the cornice looks just the same now as it did when it was first applied when King George was still on the throne. Conversely, I can also show you many quite new houses where the cornice has started to crack away from the walls, leaving unsightly spaces, or the adhesive has turned a nasty dirty brown colour while the plaster is still fresh. These problems are the result of using a modern silicone or plastic based adhesive instead of the natural plaster adhesive.
Buildings tend to hang around for a lot longer than we do. They move literally on a daily basis, either from the changing temperatures through the day, or the wind, or even as the earth itself moves, builders call it breathing. Architects design buildings specifically to withstand these natural movements without risk of collapse. Please do not fall into the trap of mixing materials simply because somebody told you it would be fine; different materials always 'breath' differently. If they 'breath' differently, they will inevitably part company.
What Adhesive and How Much Do You Need?
Bonds recommend you use only the adhesive we supply for use with our Decorative Plaster. It's cheap, you simply mix it with water to a thin paste for use, and it is made entirely of the same material as our Decorative Plaster. Therefore it 'breaths' in exactly the same way and lasts just as long.
I am often asked how much cornice can be fixed with 1Kg of adhesive. In much the same way as I can't tell you how long a piece of string is without seeing it, I can't tell you how much adhesive you'll need without seeing the surface your working on, the cornice you're fixing and the waste you generate. As a general rule of thumb, 1Kg should fix up to about five metres of cornice. Having said that, if your cornice is small and your walls etc are flat, you will use a lot less. If the walls are very uneven, or the cornice large, then you will need more, especially if you waste it by mixing more than you can use before it starts to set. (it sets in 5 minutes or less dependent upon the humidity and temperature)
As I said earlier, our adhesive is very cheap, so I would suggest you buy more than you think you need, and if you have some left over, it makes excellent decorators filler, and it's a lot cheaper than you can buy filler anywhere else, so it will still save you money as you continue to decorate your home.
Preparation
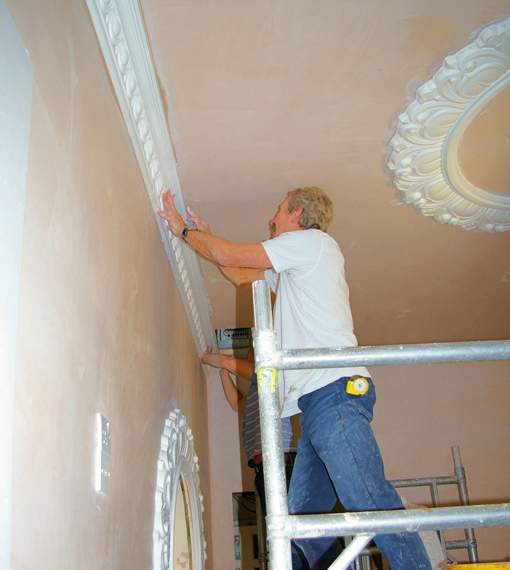
Erect your working platform. If you are hanging cornice, it's best if you can reach the whole length of where the wall/ceiling meet along one wall by walking along your platform without having to keep climbing up and down steps. If you are working with whole lengths of cornice (usually 8 feet long) it is essential that you can at least reach both ends of the cornice safely without leaving the working platform or you will find doing this job impossible. A few up-turned milk crates or two sets of steps with a scaffold board slung between them (don't forget to support it in the middle) will do nicely. For rooms with high ceilings, I would suggest you erect two small scaffold platforms and link them together. Always have an eye to safety. Our doctors are wonderfully skilled people, but they have enough to do already, they don't need your help to keep themselves busy.
Preparation
Erect your working platform. If you are hanging cornice, it's best if you can reach the whole length of where the wall/ceiling meet along one wall by walking along your platform without having to keep climbing up and down steps. If you are working with whole lengths of cornice (usually 8 feet long) it is essential that you can at least reach both ends of the cornice safely without leaving the working platform or you will find doing this job impossible. A few up-turned milk crates or two sets of steps with a scaffold board slung between them (don't forget to support it in the middle) will do nicely. For rooms with high ceilings, I would suggest you erect two small scaffold platforms and link them together. Always have an eye to safety. Our doctors are wonderfully skilled people, but they have enough to do already, they don't need your help to keep themselves busy.
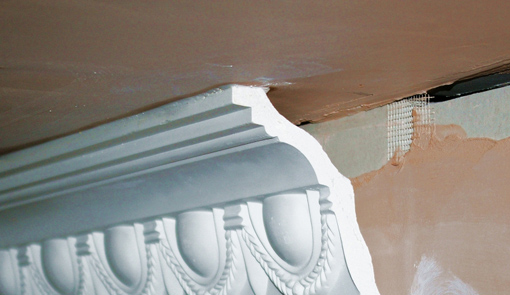
Keying Your Surface
Before you start sticking up decorative plaster, you should make sure the wall and ceiling where the adhesive is going to touch is keyed. This means taking off any loose or flaky paint, dust and dirt and putting some very shallow light scratches in the existing plaster.
Before you start sticking up decorative plaster, you should make sure the wall and ceiling where the adhesive is going to touch is keyed. This means taking off any loose or flaky paint, dust and dirt and putting some very shallow light scratches in the existing plaster.
Initially brush off all the loose stuff, dirt, dust, loose paint etc using the soft hand brush. Then lightly score the surface with the wire brush. This will key the wall perfectly. Another thing, I have read several instructions on the web which suggest you should first prime new plaster before fixing Decorative Plaster to it. I disagree with this as well.
New plaster should be sealed with a solution of water based builders adhesive such as Unibond and left to dry before starting with the Decorative Plaster, but do not prime the wall with any kind of paint. The very reason you 'key' the wall, is to get the adhesive in contact with the wall plaster, therefore why on earth would you want to prime new plaster? You want the Decorative Plaster adhesive to be stuck to the wall, not to a thin layer of paint or primer which will ultimately part company with the wall as time passes.
Marking Out
Cut a small length of the cornice (about 3 inches will do) and offer this up to the wall and ceiling oriented as the cornice will eventually be fixed and put a small mark (the smaller the better. Remember, you only need to be able to find your mark once, you're not painting a mural) on the wall and ceiling at its edges.
Repeat this operation all along from one end of the room to the other about every twelve inches (30cm). If the wall or ceiling is uneven, make sure you make your marks at the high spots, not the low.
You can find the high spots with your straight edge. Just offer the straight edge up to the ceiling and wall, and where the straight edge touches is a high spot. If it touches all along the wall or ceiling, you should find the man who originally plastered the wall and give him a bonus. (I heard another rumour when I was young that there exists a plasterer who is so good at his job that his ceilings and walls are as flat as glass. I've been looking for this man for most of my life and never found him. Neither have I seen any of his work, perhaps you are the lucky one).
Continue around both corners along the adjacent walls as far as you can reach without moving your working platform. When you have marked the whole length of the wall and ceiling (including around the corners) do not bother joining up the marks, you do not need a line on the wall (more book learned advice) but drive a panel pin into the wall on each of the marks, so that about 1 inch (25mm) of the pin is sticking proud of the wall. Do not put pins in the ceiling at this stage. They will simply get in your way later and you'll have to take them out again.
The pins you have put in the wall are there to help support the cornice until the adhesive dries when you ultimately apply it to the wall/ceiling surface and give you somewhere to rest the cornice when you offer it up to the wall.
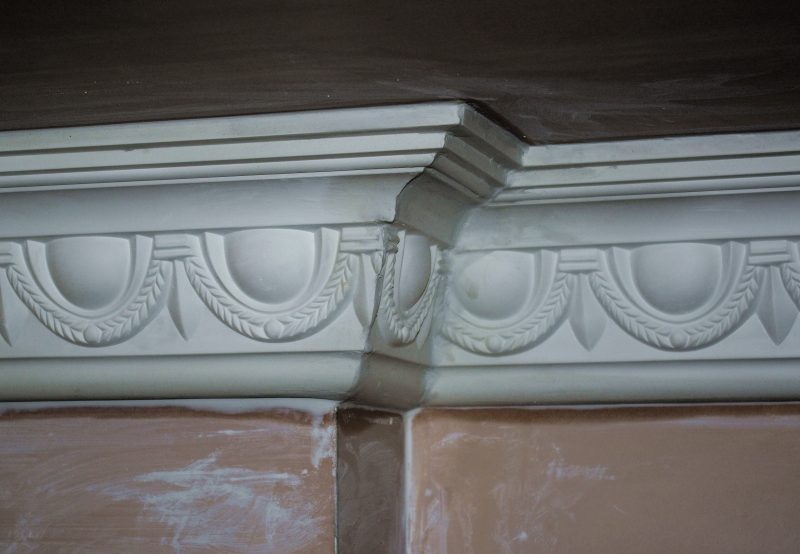
Cutting and Fixing the Decorative Plaster.
Now here's the tricky bit, and it's the only tricky bit of the whole exercise. Once you've perfected this, you can fix any Decorative Plaster made by Man, in any room in existance anywhere on the planet, and it's the reason why a Mitre Block never works unless it is a very special Mitre Block made specifically for the cornice you are working with.
Most craftsmen make their own Mitre Blocks specifically for each cornice they fix, for each needs to be cut at a different angle and it's not 45 degrees. Another method is to use (or make) an adjustable Mitre Block, which can be adjusted according to the cornice your fixing, but it would still need to be quite large. I will teach you how to do it without the mystique.
If you look at the marks you made on the ceiling, you will probably notice (in most cases) that the distance the cornice stands out from the wall into the ceiling is different to the distance it projects down the wall from the ceiling. Sometimes, the cornice is symmetrical and simply cuts the corner at 45 degrees, but in most cases it is not. A mitre block will never cut the correct angle for most cornice. Using one will lead to a very bad join, and involve you in a great deal of repair work. You must avoid this like the plague.
If you examine lengths of most plaster cornice, you will see that there is a small piece of waste at each end. This is left during the moulding process. Some Manufacturers remove this, so their decorative plaster looks nice straight from the factory, but most leave it on to protect the ends of the cornice and minimises the risk of the pattern edge getting damaged whilst in transit. You should cut this waste off tight against the pattern edge using a fine toothed saw, or better still, the electric cross cut saw you just bought.
If you look at the handle of your hand saw, you should see that the back edge of the saw itself can be used as a T square. Using this, mark the cornice with your pencil tight to the pattern edge and cut off the waste. Do not cut into the pattern. Alternatively, use your electric cross cut mitre saw to do this, (which I strongly recommend you invest in).
Making Sure Your Mitre Fits
Measure the distance from the wall to one of your marks on the ceiling. This is the depth you must cut your Mitre to. Taking a length of cornice, (I personally would cut a short length for this part, say about 2 feet long, and make sure the very next piece I fixed along that wall was the off-cut from this same length) and making sure that you are working on the end that will ultimately fit into the corner, measure in from the corner end along the top of the cornice, precisely the distance that your ceiling marks stand out from the wall, and mark the very top of the cornice at its leading edge (the edge which stands furthest from the wall).
Cutting the Corner the Difficult 'By Hand Method'
Using your fine toothed saw cut the cornice diagonally from this mark to the bottom corner in a straight line keeping the saw angled as close to 45 degrees from the vertical away from the edge as possible. For best results using this method, lay the cornice down flat on your work surface, and slowly cut through with the saw so you are cutting through the whole surface with each stroke keeping the saw angled at 45 degrees as you go, ultimately your saw cut passes through your pencil mark at one end and the bottom corner of the cornice at the other end. DO NOT TRY AND CUT IT DOWN FROM THE TOP TO THE BOTTOM IT DOESN'T WORK.
You should now have a piece of cornice which is perfectly mitred to go into your first corner. You will notice I said as close to 45 Degrees as you can. It isn't necessary for this to be exact, just get close.
When you offer the cut end up to it's opposite number in the corner, as long as you have got close, the adhesive you put in the join will take up any slack. If the angle you cut is hugely more than 45 degrees, you can always trim the hidden back part carefully with a sharp knife. If the angle is less than 45 Degrees, then the front of the cornice will still match, and you can put extra adhesive in the back to fill the space. As you are using adhesive made of the same compound as the cornice, it will simply become one with the cornice and make no difference (another advantage of using the right adhesive). Eventually, after you've done a few corners, you will cut your corners (or Mitres) more and more accurately until you are expert at it. Practice makes perfect as they say.
The important angle is the one down the face of the cornice, the join that everybody will see, and if you measured it, marked it, and cut it as I described, this will be perfect. If you get this angle wrong, it is almost impossible to make it good later.
Cutting the Corner the Much Easier 'Electric Cross Cut Mitre Saw Method'
Having made precisely the same marks on your cornice as for the By Hand Method, put your cornice on the bed of your electric saw, set the saw angle of your cut to precisely line up with your pencil mark on the top leading edge and the bottom corner and lock it in place. Now tilt the saw blade over to 45 degrees, then make the cut. This will give you a perfectly mitred corner cut on your cornice. Every time you do this it will be perfect. No trimming. No practice necessary. By far the easiest method.
Whatever method you use, I would suggest you cut both corner pieces for your first corner before sticking anything to the wall. Mitred corners never perfectly fit into a corner for reasons too complicated to explain here, so you get much better results if you can offer up both corner pieces at the same time, and adjust them accordingly before the adhesive sets. Be sure to apply adhesive to the ends forming the corner as well as the edges of your cornice. Any gaps can be filled at this stage with the excess adhesive squeezed out from your joins, and smoothed in with your finger.
Forget about doing this with a filler or putty knife. You will only get lines left behind by the knife, which you will still have to smooth out with your finger.
Fixing the Cornice
Before you start this part, make sure you have some panel pins in your pocket, and your hammer where you can reach it without letting go of the cornice (I usually drop the hammer handle down the top of the scaffold tubing, or hook it in the front of my shirt, or hang it from the breast pocket in my shirt).
You may have read somewhere that you can hold the cornice up against the ceiling until the adhesive 'grabs' then let it go to move on to the next stage. This is yet more rubbish and simply adds to the confusion surrounding the fixing of Decorative Plaster. I have worked with every kind of adhesive ever devised by man, fixing every kind of material. This mythical thing called adhesion 'grab' does not exist.
Unless you want to spend half your life holding things in place, and the other half cleaning up the mess, because you didn't hold it long enough, you should always plan ahead. One length of cornice could easily weigh five or six Kilogram's. I've never found the adhesive yet that would 'grab' this sort of weight for even a few seconds before it had properly started its curing process, let alone be able to release it while I ferreted about for pins and tools. If you ever meet a man who claims to have put cornice up by holding it there until the adhesive 'grabs' and then let go of it without it falling on his head, you are either talking to a man who has only ever worked with the very smallest pieces of cornice, an Indian Mystic, a liar, or a man who enjoys watching paint dry. Whatever he is, don't believe him, for I guarantee it won't work for you.
Mix with water sufficient of your adhesive to apply a coat to each of the edges that will be in contact with the wall or ceiling and press this against the wall/ceiling surface with the bottom edge resting on the panel pins you previously drove into the wall, and the point of the mitre against the apposing wall in the corner. Press the cornice against the wall and ceiling so the adhesive squeezes out from the join. Wipe the excess adhesive from the join with your finger, and use this to fill any spaces that you can see due to the wall/ceiling being uneven.
Mix with water sufficient of your adhesive to apply a coat to each of the edges that will be in contact with the wall or ceiling and press this against the wall/ceiling surface with the bottom edge resting on the panel pins you previously drove into the wall, and the point of the mitre against the apposing wall in the corner. Press the cornice against the wall and ceiling so the adhesive squeezes out from the join. Wipe the excess adhesive from the join with your finger, and use this to fill any spaces that you can see due to the wall/ceiling being uneven.
Once you have the cornice in place, you should drive sufficient panel pins into the ceiling against the edge of the cornice always ensuring that you support the cornice and keep it pressed to the ceiling with the hand holding the panel pin. Once you have one panel pin in place you will be able to let go of the cornice. Usually one panel pin every 12 inches or 30cm is enough to hold most cornice. Only remove the pins when the adhesive is set. The adhesive will set quite quickly, certainly within minutes not hours, but it's usually best to leave them in place for longer than this, just to be sure. I usually leave them over-night.
All the pins can be removed later when the adhesive is dry. They will just pull out using thumb and finger. The small holes they leave can be filled with a dab of adhesive.
Repeat the exercise for the apposing wall of the corner (making sure to work with a fresh length of cornice) so that you have formed a complete corner turn (you will probably need to slide both pieces forming the corner about a bit to get the perfect fit). You should also now notice that you have a perfect match for the pattern repeat around the corner. Making sure to always use any off-cuts of cornice against the piece originally cut off the length, (try to avoid getting them mixed up) you can now proceed to apply cornice around the whole room.
Large Cornices
We are often asked if we can supply larger cornices, like the Victorians and Georgians used. Well the truth is, we already do it's just that it isn't obvious.
The Victorians and Georgians did not usually make larger cornices than we do today. In fact, many of the moulds used today are the same moulds as the Victorians used. They didn't make bigger cornices; they simply put two or three together to give the very large room decorations that can be seen today in many of the buildings they built.
If you want a very wide cornice, you have to put it up in separate pieces. Having first found the patterns that you want to put together, first fix the bottom, or lower one, leaving just enough space between the top of that cornice and the ceiling to accommodate the second or top cornice. You must also stand it out from the wall the same distance it would have stood out if it had been fixed to the ceiling.
When you have finished the first cornice and the adhesive has set (usually the following day) you can fix the second cornice layer by sticking it to the top edge of the bottom cornice and the ceiling. You can do this as many times as you like, though it does get progressively more difficult to do the more layers you want to build up. This is mainly due to the difficulty of supporting each successive layer as you build it. Some imagination is required here. You must have support for the top and bottom edges of your cornice as you work to give the adhesive time to set.
I have found shelf support brackets quite useful for supporting the top edge of cornice not fixed to the ceiling. The brackets can be screwed to the ceiling along one face, while the other face protrudes down and against the leading edge of the cornice to support it while the adhesive sets. When the brackets are removed, the screw holes are easily disappeared with a dab of adhesive/filler. Repeated layers of cornice is simply a case of repeating the procedure.
If you are a beginner with Decorative Plaster, and you want a larger cornice than you can buy in one piece, but do not possess the skills to fix multi layers of cornice, you can get almost the same effect by using plaster wall/ceiling beading or flat moulding; these are fixed either on the wall below or the ceiling above the cornice and is precisely what the Georgians and Victorians did to build up large cornice decorations around their rooms. Bonds sell a variety of wall panel beading, dado rail, architrave etc, in our friezes beading and dado section of our site. All these can be used in conjunction with cornice to build up large displays where the ceiling meets the wall of any room. This is precisely how the ancients did it.
If you are a beginner with Decorative Plaster, and you want a larger cornice than you can buy in one piece, but do not possess the skills to fix multi layers of cornice, you can get almost the same effect by using plaster wall/ceiling beading or flat moulding; these are fixed either on the wall below or the ceiling above the cornice and is precisely what the Georgians and Victorians did to build up large cornice decorations around their rooms. Bonds sell a variety of wall panel beading, dado rail, architrave etc, in our friezes beading and dado section of our site. All these can be used in conjunction with cornice to build up large displays where the ceiling meets the wall of any room. This is precisely how the ancients did it.
If you look closely at the image of a ceiling on our home page (the one with the gold coloured ceiling panels) you will see that the coving around the room is made up of a cornice in the corner, and a frieze on the ceiling, and another on the wall. Below that is another small cornice which houses the LED rope light, which illuminates the room by shedding light onto the ceiling, but is hidden from view inside the cornice.
Some Simple Rules to follow when fixing cornice.
Always work in the same direction.
Always start from the corner near the door not above it.
Always finish in the corner above the door.
Never mix up off-cuts unless you match the pattern run.
Don't try working off one set of steps unless you like hospitals and you don't mind people laughing at you.
Don't mix more adhesive than you can use before it starts hardening (about 20min).
Always mix the adhesive slightly runnier than you think you should (just short of a slurry is about right. It should stand up, but not be stiff).
Always wet the surfaces where adhesive is to be applied.
Always take advantage of help if it's available.
Never worry about cutting cornice, it will always match, it's like wallpaper.
Always buy about 5% more than you think you need, to allow for off-cuts and waste, more if there are lots of corners or a long pattern repeat.
A small investment in an electric mitre saw with sliding and angled cut will pay dividends, and save a lot of pain, grief and misery.
Fixing Ceiling Roses and other decorative plaster
Ceiling Roses
Fixing ceiling roses and other decorative features is easier than you think.
To fix a ceiling rose, you should first find out where the joists are in your ceiling. You can do this quite successfully by first tapping the ceiling until you hear (or feel) a solid thud, then check that it really is a joist by trying to push a bradawl or small sharp electric screwdriver into the ceiling at that point. If it's a joist, the bradawl (or screwdriver) will not penetrate the ceiling further than the joist. If its just a lathe (a thin piece of wood used to support the ceiling plaster in lathe and plaster ceilings) the bradawl (or screwdriver) will punch through the ceiling into empty space. Don't worry about damaging the ceiling, your ceiling rose will cover it all up. Mark the line of the joist with a small pencil mark, well outside the area of ceiling soon to be covered by the ceiling rose.
Offer the rose up to the correct position on the ceiling, put a pencil mark on it in the line of where the joists are. Choose places where the plaster is smoothest and flattest, it will be easier to make good later if you keep clear of patterned areas. Then drill two or three holes (dependant upon the size of the rose) through the rose on the pencil marks and counter sink them. Try to do this so you fix to at least two separate joists, or at least keep the screw holes 12" to 18" apart along the same joist. Apply several dabs of adhesive to the back of the rose, press it firmly against the ceiling, and screw it to the joists through the pre-drilled holes.
Remember that the screws must go right through into the joists. It's no good screwing to the ceiling plaster. The rose will simply fall on your head. The ceiling plaster is probably at least 1" thick (allow 2" just in case) allow another 2" to screw into the joist. It doesn't take a genius to see that a 5" or 6" screw is what you need. Use a shorter one at your peril, (or if you think a nice large hole in your ceiling approximately the size of your ceiling rose will give you something to talk about, when the conversation dries up during dinner parties).
After you've screwed it, fill around the edges and in the screw holes with more adhesive using your finger as a pallet knife.
Always work off a good working platform. For large ceiling roses, I would recommend you recruit help. An extra pair of hands to help you hold it up while you screw fix it are always valuable. For very large ceiling roses - above about 1200mm - you may need several men to hold it up while you fix it. Some of the larger ceiling roses need four or five men just to lift it up there, let alone fix it.
I have often been compelled to cut very large ceiling roses in half, or even quarters to fix them, simply because they were too heavy to lift up there. Don't be afraid to do this. Plaster is infinitely repairable, the joins are easily disappeared.
Wall and ceiling panels
These are usually comprised of long lengths of beading, with complimentary corner pieces. First you should mark out the surface exactly where you want to apply the beading. Be sure to measure from the walls into the ceiling (for ceiling panels), or from the floor, ceiling and adjacent walls (for wall panels) carefully so you have a perfectly symmetrical and balanced arrangement. Even the slightest miss-measure here will result in an error which will stand out like a sore thumb when the composition is finished, and it will be too late then to put the error right. You can always paint or wallpaper over a miss-placed pencil mark, not so with the finished product.
When you have marked out your wall or ceiling, step back from it and simply look at it critically. Let your eyes do the talking. If you've misjudged the symmetry, your eyes will tell you, it will be obvious. Only when you are satisfied that the panels are in the right place, should you stick anything to the wall or ceiling.
Decorative plaster always needs supporting while the adhesive is setting. You can do this in a variety of ways, but I always prefer dressmaker's pins, or very thin panel pins about 40mm-50mm long. These can usually be pressed into the wall or ceiling easily by hand and removed the same way, whilst leaving almost no mark. Whatever mark they do leave is easily filled with a little adhesive. They can also usually be bent around or under the Decorative Plaster by hand pressure, to cradle it and hold it in place while the adhesive sets.
Always place the corners first then fix the beading between the corners along the pre-drawn pattern lines. When laying patterns which include curves or circles, you should invest in a builders or artists compass. These can be of varying sizes, and can be set to scribe curves with radii of several feet. If you need more than this, you will have to resort to the tried and tested method of a pencil attached to one end of a piece of string, with the other end attached to a nail fixed in the ceiling or wall at the centre of the circle.
To scribe an oval or ellipse, you will need to put two pins, one for each focii of the ellipse, a piece of string long enough to give you the ellipse you need, and a pencil. If you don't know what I mean, look in a GCSE (fourth grade) technical drawing text book.
Whatever design you have in mind, always draw it on the surface before starting to fix the plaster.
Columns and Pillars
Hint: have some string to hand.
Plaster columns and pillars are not structural products, they are decorative products designed to encase an otherwise visually intrusive structural necessity such as a concrete, brick or steel pillar essential to stop the building falling down. For this reason, plaster columns or pillars and all associated parts such as plinths (the foot) or capitals (the top) are supplied in two equal halves which go together like the two halves of an Easter Egg, and are stuck together with adhesive.
Bond's Plaster pillars are made so they can be cut to length without losing the pattern, and they have an inner diameter of 18" (450mm) which is usually large enough to encase most structural pillars. We supply plinths and capitals to match.
First put the plinth down around the base of the pillar you wish to hide and stick it together using our adhesive. Wipe the excess adhesive off with the tip of your finger. The plinth can be stuck or screwed to the floor (dependant upon whether the floor is concrete, stone or timber). Any screw holes can easily be hidden with a little adhesive filler.
The column fits inside a small recess made for the purpose on the top of the plinth. Measure from the seating lip of the recess to the ceiling. If you are using a capital, measure the depth of the capital from the column seating lip to the capital's top where it meets the ceiling. Deduct the depth of the capital from the height of the ceiling from the seating lip in the plinth and cut the column halves to this length.
Seat a column half into the seating lip set in the plinth, having first applied sufficient adhesive in the seating lip so some of it squeezes out of the join when you press the column half down. Make sure to have the full face of the column facing into the room, so the ultimate join between the two halves will be down the least visible sides, not in full view.
Wipe the excess adhesive off with your finger, using any surplus to fill any gaps you see.
Using a long spirit level (the longer the better) ensure the first half is perfectly plumb. (ignore the existing structural pillar. It should be plumb, but sometimes it isn't, so don't rely on it. Leave the first half in place for half an hour or so to allow the adhesive to set. Support it with a prop if you don't feel confident enough to walk away from it without some support.
Once the first half is properly set, apply a liberal amount of adhesive to its back edge and into the plinth seating lip and place the second half in place. Press the two halves together so the adhesive squeezes out of the join. When pressing them together, make sure you hold both halves, or you'll knock the first half over.
Tie the two halves tightly together with some string and go and make yourself a cup of tea (coffee if you prefer), to give the adhesive time to set.
When you've finished your tea you're ready for the capital.
First check that the halves of the capitals will fit snuggly on the top of the column without spaces between the ceiling and the top of the capital. If it's too tight, trim some plaster off the top of the column. If too loose, apply extra adhesive to the seating rim, or on the top of the capital to take up the gap. Be sure to apply adhesive along the contact edge where the two capital halves meet. Make sure the seams of the plinth, column and capital are all along the same line in the least visible sides of the whole assembly.
Seat both capital halves on the top of the column at the same time. If you need help, get a friend to hold one half in place while you locate the second half. Press both halves firmly together so the adhesive squeezes out from all the joins. Tie the two halves together with more string, wipe the excess adhesive off with your finger, and Hey-Presto you've built your first column and disappeared that awfully unsightly steel or concrete pillar which just happens to be holding your building up.
Fitting corbels:
These are usually used to embellish the ends of a beam or something that looks like a beam across your ceiling. Usually the thing that looks like a beam but isn't, is actually a box usually formed of plaster or plaster board, which has been constructed around a lintel or steel beam which provides support for the floor or ceiling joists above.
Corbels can also be used to provide decorative features above doors, random shelves for ornaments or vases around the room, or to decorate a fire place.
Fixing them is easy, as long as you don't forget to support them while the adhesive sets. They can be quite heavy, for they are usually made from solid lumps of plaster. Effectively, they are designed to mimic the stone or brick corbels used to provide additional support to load bearing beams, but of course, plaster corbels are not load bearing structures.
To fit a corbel, first measure its depth (how far down the wall it will reach when in place). Drive two 40mm or 50mm pins into the wall at the precise point where the base of the corbel reaches down the wall, leaving them protruding about 1" (25mm) from the wall.
Apply a liberal layer of adhesive to the back and top of the corbel where it meets the wall and ceiling, and press it into place so the excess adhesive squeezes out, letting its base rest on the pins. Drive another pin into the ceiling tight against the front of the corbel, wipe the excess adhesive off with your finger, then leave it for an hour or so to let the adhesive set.
Other features
Other decorative features are applied in just the same way as above. The golden rules are:
Always mark the wall where you want your feature before you start.
Always support the plaster while the adhesive sets, (otherwise it will slide before the adhesive sets, and then set in the wrong place, very difficult to put right).
Always ensure that the rules of symmetry are followed. The eye can pick up the slightest error.
Always work off a good safe platform. (Steps are for changing light bulbs, not fixing plaster)
Always enlist help unless you really know what you're doing.
If you're a beginner - Read everything written above carefully before starting.
A golden rule for you, to help get you through life. 'It's the cocky who spend most of their time putting things right.'
Repairing Painting and embellishing your decorative plaster:
The advantage that natural plaster has over virtually every other material is that it can be cut, carved, drilled, sawn, nailed and painted without any more special treatment or consideration than you would naturally give to any building material.
If it is damaged in any way, it can be infinitely repaired. It is normal for the plaster, even new plaster, to have hairline cracks, chips or other minor defects. All these can be repaired or made good with ease. In most cases a thin smear of adhesive or filler (always applied with the ubiquitous finger) will disappear virtually any defect in seconds. Even if it is severely cracked or broken, it is still easy to repair or make good. Always remember, decorative plaster is not structurally significant, it is simply an embellishment. It is infinitely repairable. It isn't as if it were a cracked lintel, a split beam, or a cracked wall. It is simply decoration. Quite often any hairline cracks or blemishes will disappear under a coat of white emulsion paint.
Many times over the years we have received telephone calls from panicked customers who tell us their plaster has been cracked in transit, or they've dropped it and it cracked, and they're afraid it will all fall apart when they try to fit it. We even get calls like this from so called professional plasterers. This is all nonsense. The plaster is reinforced with strands of fibre glass, millions of them. It will not fall apart just because its got a few cracks in it. In virtually all cases, a little filler or adhesive painted onto the surface will disappear any and all hairline cracks. Wiping it off with a damp cloth will leave the surface as smooth and as perfect as it can ever be.
Suppliers are on your side.
All manufacturers and suppliers of decorative plaster do everything within their power to deliver their product to the customer in perfect condition. This isn't always possible. Haulage companies are notoriously clumsy it isn't unheard of for them to impart slight damage to decorative plaster products when they are moving and handling it. The most important rule to remember is that it is almost impossible to damage decorative plaster beyond repair, so don't treat it like its made of glass, and some cracking is normal, not unusual. Learn to work with the product as it is, rather than try for perfection. The perfectionist goes through life eternally disappointed.
How we deal with old buildings.
Often, on very old buildings where the walls or ceilings are not very flat, we have to actually break the decorative plaster purposely to make it fit properly, then make it good afterwards. Sometimes, to get the 'weathered' effect we will break it and repair it, to make it blend in with everything else around it so it doesn't stand out as 'too new'. Don't cry if you drop it and it chips or cracks. It isn't milk. It is easily repaired. The fibre glass reinforcement will usually ensure that a crack does not develop into a full blown break. It is actually quite hard to break fibrous plaster even if you want to, the fibres simply don't allow it.
All you need to make it good is to ensure you use the correct adhesive/filler and not some micky mouse plastic imitation which some clever sales advert on the TV sold you.
Painting it and why.
Plaster can be painted using virtually any common household paint. Colour, water, acrylic, or oil based, it isn't important. It can even be painted using 'marble effect' or 'graining effect' paint. The French used this technique to great effect throughout the 18th and 19 centuries, and it is now again coming into vogue.
Traditionally, decorative plaster was always painted. If you want to see some fine examples of this, and are seeking inspiration, go and look at some of the buildings which still house original plaster, including the paintwork. Visit the Palace at Versailles, or the debating chamber in the House of Lords, or Blenheim Palace, or any one of the hundreds of large country houses open to the public and maintained by The National Trust.
For some unaccountable reason, during the 20th Century, people got into the habit of painting decorative plaster white. Personally, I hate it like this. I believe grapes should be pale green or purple, leaves should be all sorts of green shades, branches should be brown, and colours like red, gold, blue, and yellow should be everywhere. The plaster is only part of the story. How it is painted is just as significant. Minimalism if fine, as long as you're Japanese, or an arty farty designer with very little vision and short of the patience or imagination to finish a room properly. A properly decorated and painted room is absolutely stunning. Nothing beats the visual impact of a room full of properly painted decorative plaster. But then, perhaps I'm just old fashioned.
Cleaning the old stuff.
Cleaning old paint from old plaster can be a painstaking and time consuming job, especially if the plaster is intricate with lots of lumps, bumps, or recesses in it. Often, it is easier to remove the old plaster completely and replace it with new, rather than clean or strip existing. So consider whether the old plaster you wish to restore is worth the effort before you start.
Don't use sandpaper on it. This will only ruin the finish. If you need to clear old paint out of cracks and recesses use a small pointed trowel, (an old steak knife is perfect) or a small paint scraper. Try not to scratch the surface under the paint, or chip the plaster. Commercial paint stripper can also be used, or even a blow lamp to loosen the paint if the paint is oil based. Don't use chemicals or heat on emulsion, you're wasting your time.
Copying the old stuff.
All old decorative plaster can be copied. Bonds: Plaster Mouldings do not offer this service. Be warned, it is the most expensive option available. It entails cutting a short length ( about 1 metre long ) of the existing plaster from the wall in one complete, undamaged piece. This is often difficult enough in itself, and could require several attempts. This piece is then used to make a fibre glass mould, which is usually repeated to make a mould 2 or 3 metres long. This is then used to caste replicas of the original. It is skilled work, requiring travelling, time and lots of experience. This all adds up to money. It is expensive. It is up to you to judge if it is worth it.
Removing old plaster and replacing it with new will usually take a lot less time, require less expertise, and will be a lot cheaper than trying to copy a few metres of old plaster. Very often, it is possible to buy new plaster which is very close if not completely identical to the old, so it isn't really necessary to copy existing unless it is very ornate, exclusively original, and thereby intrinsically valuable. Usually only very old, usually listed buildings, with considerable historically significant architectural value are worth the time and money it will take to copy original plaster decor.
Job satisfaction.
Nothing gives greater satisfaction than looking at something which was difficult to do, but beautiful to see when finished, especially when one can say 'I did that!' and know that virtually every other human being on earth would find it almost impossible to emulate.
The illusion of old buildings.
In older Edwardian, Georgian or Victorian buildings, it is common to see great expanses of plaster forming huge coving or cornice effects around a room. Do not be fooled into thinking this is one cornice that we have forgotten how to make. We haven't forgotten anything. It is usually a selection of cornice, beading, and other flat or shaped lengths built up layer on layer to form the very ornate effects visible today. We still know how to do it, and it can be done by selecting from the extensive range of similar products offered by Bonds Plaster Mouldings. If you want advice on doing this, read everything written above.
If you still need help, telephone us and we will help as best we can.
A lot of the old plain coving in older buildings was run on the ceiling. This is very difficult to do. It doesn't just need skill, it needs strength. Look at a plasterer who has been doing the job for ten years or more, and you will see a man who's upper body is shaped in the classical triangle. The upper body strength needed to run plaster straight on to the wall hour after hour, day after day, is beyond belief. Back trouble is an endemic occupational hazard for plasterers. This is why most modern plasterers don't do it any more. It hurts! This doesn't mean we can't do it. We just choose to get the same result in an easier way.
How the so called professionals confuse the simple things in life.
Last year I went to visit a renown country manor, and during the guided tour, the guide informed everybody that the intricately fine moulded plaster decor that we could all see on virtually every surface was all run or carved individually by hand directly on the ceiling or walls. This is so much rubbish, (and I said so). Ignorant people, usually with a few letters after their name, with no practical experience at anything, buts lots of books, have the irritating habit of believing that anybody who creates something with their hands is stupid, so they make rediculous assessments like the one above. Even the Greeks knew how to make moulds, they invented concrete (you have to mould that), and used all sorts of other building techniques which we forgot and then took centuries to rediscover. The Romans perfected much of what the Greeks knew. Certainly by the 17th Century, we had once again learned how to mould plaster (if we ever forgot) and most intricate plaster work was done with moulds, just the same as it is today.
One thing which is certain. If there is a complicated plaster product on a wall, which is repeated again and again throughout a room or building, it was done using moulds. Not individually carved item by item throughout the building. Just because you lived in the 16th century, that didn't make you a fool. If you could caste a bell, you could sure as hell caste a piece of plaster. So the next time you hear somebody trying to tell you that all the intricate repetitive plaster decor in a room was cut by hand in situ, take a very large pinch of salt, and throw it at the speaker.
Some of the cleverest most ingenious men I have ever known were builders, and I've got three degrees, have run my own business for decades, and rubbed shoulders with some very clever literate men most of my life. For interesting conversation and imaginative thought, give me a builder every time. Architects and designers are great for telling people what they want. It's the builders who actually turn those ideas into reality and make them work in a practical way which doesn't fall over in the first high wind.